Sunday, March 17, 2013

Knock Me Off

A couple weeks ago I talked about creating a new blog series called the High Low list... I worried a little bit about copyright infringement because it seems there are a lot of "High Low" features in magazines and online. In fact, HGTV had a brilliant series with Sabrina Soto that was called "The High Low Project" and I absolutely loved watching that show. HGTV hasn't been very much fun lately since it seems like every time I find time to flip on the TV it's just another house hunting episode. ,/Bor-ing,/,/

But since I am forever online browsing and finding some good knock offs, I am going to rename the High Low list to "Knock Me Off." Hopefully nobody has used that before!  So here we go with the next (first?!) installment of Knock Me Off!

High Low


Saturday, March 16, 2013

Friday, March 15, 2013

Floor It.

As I mentioned in an earlier post, my lower level Media Room is on the books for renovation. The major player in this renovation will be the floor. Since my biggest worry is putting down major $$$ towards a floor that may be damaged in the near future by torrential floods... ok, ok, minor water seepage... my flooring options are pretty limited. Water does not play nice with wood or laminate, so that knocked those two out of the ballpark. Tile floors were an option, but there was still the worry that some water could come in and get waterlogged (ohhhh, so that is where that word came from...) and cause mold to develop. There was also the fact that my lower level is related to an igloo on the warmest of days, and tile is very cold. And obviously, while one could do underfloor heating, that would definitely not play nice with water.

Another option is carpet. Which is what I currently have downstairs. In fact, when we moved in, we paid extra to install new carpet in one of the rooms. Fast forward a couple years from moving day and with water coming into my lower-level with every rain, we had to pull the carpet up and let it dry out. (And did I mention, I have 3 bookshelves packed of books, so every time we had to pull the carpet up, we had to empty those shelves and move those books?! Torture.) So I knew I definitely did not want to do carpet again on the chance that water comes back in.

That leaves me with Vinyl. This is where I point out that one of the projects we completed when we moved into this house was to tile the laundry/storage room with vinyl stick-and-peel tiles. I don't have any pictures saved, apparently, of the floors in their completed (and new!) glory, but over the years the tiles have not held up well, particularly with water damage. I can't take any good shots right now, because I have crammed that back room full of stuff trying to clear out the Media Room for it's renovation, but I was able to scooch some furniture around to grab some shots for you. Here are the vinyl tiles from my laundry room:


The second picture tells the best story of the water damage. If you have boxes sitting on the floor, and water comes in and sits under the box... when you lift the box you also peel off the surface of the vinyl tile. Not a fan of Vinyl, am I.  So going into the search for my new flooring was a bit of a concern. 

My dad and I took an evening after work to go to a few flooring stores so I could see my options and price them out. Because I have good taste, I gravitated towards the more pricey vinyl flooring options. I was looking at vinyl options of $4.50-$5 a square foot. And since I needed roughly 360 square feet for the Media Room and hallway (not including the bathroom and back bedroom...), I was looking at roughly $1,900-2,200 for these flooring options.  

The first store we went to the sales man was not overly helpful. He directed us towards the sale vinyl. I wrinkled my nose at the options, so he then directed us towards the other vinyl, and I looked at a few options that were nicer on the eyes. We asked him a few questions and were told that we could just lay the vinyl planks on the floor for a floating floor. If water came in and damaged the plank, we could remove it.  Here's the thing though, these planks were locking, so that would be a little difficult to unlock a specific plank and replace it. The sales man then wandered off with a vague "come find me if you have questions."  Here were some options from that first store I was eyeballing: 


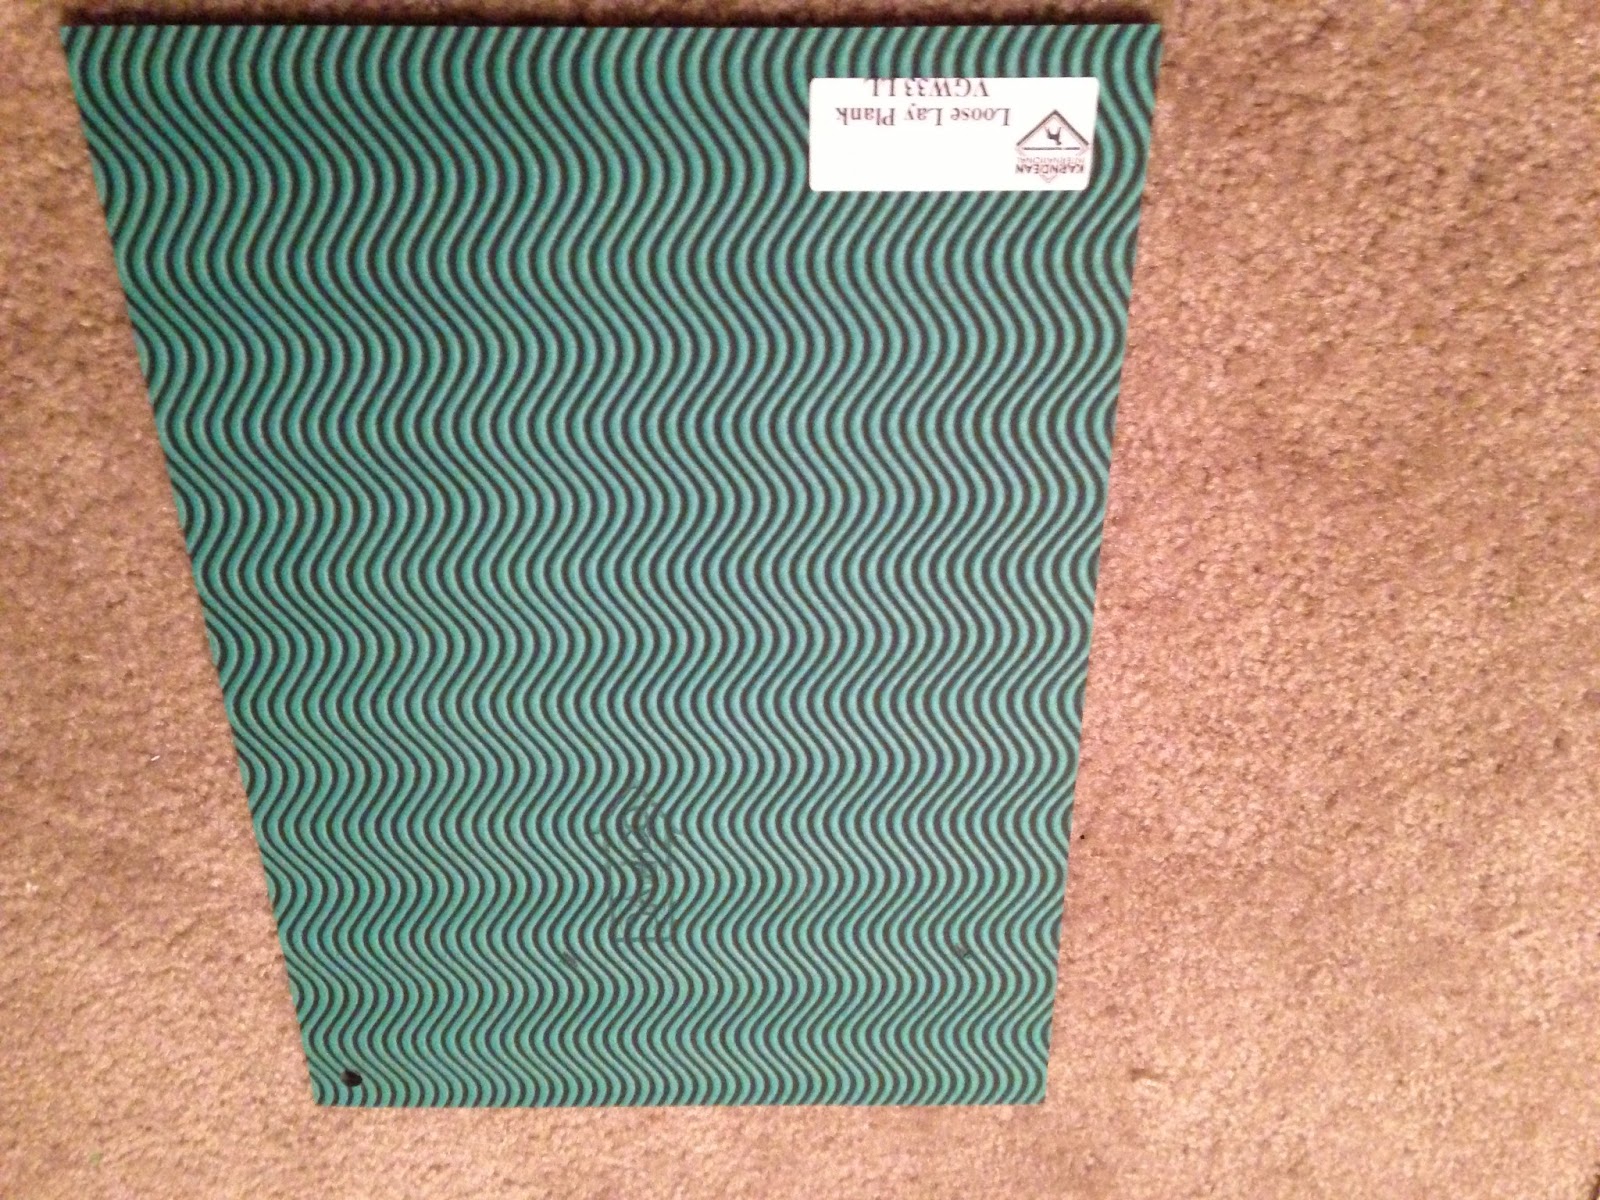
I wasn't in love with any of the options though I had my eye on the Heirloom Cherry option; and I was still looking at roughly $1,500. So we headed to Nebraska Furniture Mart to check out their options. The sales man at Nebraska Furniture Mart was much more helpful. He led us to our original option (they had the same brand in stock), and priced it out for us. It was a couple thousand more. He talked to us about leveling the floor (my eyes crossed seeing additional dollar signs, and my dad's eyes crossed hearing additional work...), and then he led us to an option that was relatively new to the market and that he had used himself. Karndean Flooring Tiles. 


This stuff is revolutionary for basements! It too is a floating plank floor vinyl product. The difference with this product is it isn't a locking product. This product literally floats on the floor, making it unique in that if a plank is damaged or water comes in, you can simply lift it up and let it air dry or replace it. I suppose the concept is very similar to carpet tiles. What really makes this product unique is the back of the plank tile. There are rubber strips along the bottom that allow water, if incoming, to flow between the strips and not damage the vinyl tile.


You can read more about the Karndean Flooring Tiles at their website if you're interested in the sales spiel, but here is an excerpt from their website that has me hooked: 
Practical flooring designed to last
Our flooring can cope with the daily demands of busy family life. Stain resistant and easy to clean, Karndean floors can handle water spillages  without warping, and a dropped mug or plate without chipping or cracking. Unlike carpets, our floors don’t harbor dirt, dust mites or bacteria.
Designed to last for many years, each floor is guaranteed for up to 20 years. Should any tile or wood plank be damaged, a spare can be fitted quickly by your installer. This is far more cost effective than damage to a portion of carpet or laminate, when the whole floor often has to be replaced.
With my basement, this product is sounding like gold. The price, definitely gold--as in hefty $$$. We were looking at a bit over $2,200 to do the Media Room and hallway (once again not touching the bathroom or back bedroom). But with all the benefits of this product, I am leaning heavily towards selecting this as my new floor.  We asked the sales guy a few more questions, "how level does the floor have to be--level-level?", "Do the edges stick up?", "Can the tiles survive an 80+ degree basement?" (I got a really weird look from the Sales guy with that question... but it did lead to an interesting discussion about the gas fireplace and how far from the floor it should be...) Really, the product sounded too good to be true. 
So I selected a sample tile to test--trying to match the color as closely as I could to my kitchen laminate flooring--and brought it home to try out.  

It is almost freaky how close the color is to my kitchen floor: 


So I might be sold. I just need to save up a few more buckaroos since I really want to get the same tile for the bathroom and back bedroom as well.  Select Flooring-check.


Thursday, March 14, 2013

On my Radar: March

On my Radar-March


Moroccan Leather Pouf - Garnet Hill / Kew Dhurrie Pouf | west elm / Gallery Frames - Antique Silver | west elm / The Land of Nod | Kids Storage: Kids Metal Locker Storage Baskets in... / Card Holder Drawer Pull

  1.  I really want some of these West Elm picture frames to mix some silver elements in with the rustic wood frames on my gallery wall. 
  2. A couple of these poufs from West Elm would be great for sitting on when Peyton and I are playing games (my tush has no padding whatsoever. none.) 
  3. A whole row of these old school locker bins from Land of Nod on my bookshelf would be pretty spiffy. Back to high school anyone? Is it weird I like things from a kids store?
  4. I still want a pouf. Just one that doesn't stink. (Yes, I'm talking about you, you stinky Moroccan pouf in my garage...) This one is from Garnet Hill... you wouldn't think they'd sell stinky poufs, but at almost $350 it's a bit out of my budget.
  5. I am crushing on these library card pulls from Rejuvenation. I think these would look great on my media chest where I store all of my DVDs. 

Wednesday, March 13, 2013

Quickie Organizing!

I cannot take credit for this idea at all, but being that I love organization and baskets, I just had to be a shameless hussy and copy this idea from Ashley from 7th House on the Left.

Image from here

There are so many talented bloggers out there and I am always inspired by seeing projects they have tackled in their homes, and I absolutely love when a project is easy and do-able for lazy folk like myself. This project does not require: an electrician, a carpenter, a plumber, or scads of money. You can do it! Heck, I did it. So first a shout-out to the wonderful bloggers who have inspired me today and gotten me to stop dithering and complete a project (tiny though it may be). Check out Ashley and Greg's blog--it is chock-full of great ideas!!!  And today, I'm showing you one of those projects that have inspired me to get up and do it already!

First up--the baskets. Ashley shared her source with us--they are Target's Threshold Small Paper Rope Baskets. So I whipped out my iPhone and checked the Target site for the baskets. ,/Ta-dah!,/,/


This is where my record started scratching... $70? For a set of 6?! ... NOT SOLD IN STORES?! Color me offended. So I hemmed and hawed and thought that surely wasn't worth it. Not to mention, I would have to wait for the delivery of said baskets. Kiss of death. 

Then, the other day, I was in Target to return a few picture frames and, naturally, I wandered the entire store and lo and behold.... Guess what I found?!?! (I don't really have to say it do I? I mean surely you, you educated reader that you are, know by now I am talking about the baskets....) 

Here is where I hugged my giddy aunt. The baskets were priced at $6.79.... each. Picture me whipping out my iPhone calculator (because math ain't my thing) and pricing six baskets at $6.79 for a grand total of $40.74. Do you hear angels singing? Pretty sure I did. Six little baskets followed me home... 

I immediately cleared out my kitchen cabinet where a random assortment of baking supplies, coffee, medicines, vitamins and spices have resided for the past few years making a lovely jumble of a mess. 


Then I tackled the old contact paper that was blotchy and sticky and just ew. (In fact, I should be embarrassed to show you this. Oh, I am... ohhh, the shame!)  I removed the white contact paper and turned to my new "grass cloth" friend: 


I lined my clean shelves with those bad boys and I got a clean slate: 


Then, with Peyton's help, we sorted our stuff out into a few piles: medicine/vitamins, baking supplies, mama's coffee stash, spices and trash. (The girl loves to clean and organize... Really, you should be asking HER why that contact paper was so dirty.. yes, that is how I roll, blame the 7-year old...)  In any case, once everything was sorted out we put them all in the baskets... well except for the Trash pile. That went into the trash. (shocker.)  You are telling me to stop yapping and show the pictures already, aren't you? 


Well, look at that.... I have an empty shelf. I think I may be visiting Target again in the very near future. 

Tuesday, March 12, 2013

Going to the Dark Side...

To help me make my decision on going dark upstairs, I looked through pictures I've saved over the year in my favorites and iPhone and thought I would share the goodies with you while I wrestle with my decision. I know there will be many people out there who think going dark is equivalent to putting on a mask and breathing scarily, "Luke, I am your father."   But they do always say you should look to your closet to see what you wear when making color selections for your home.... 90% of my closet is gray and black. And the pictures and H.G.T.V. shows I love the most showcase dark rooms. 

Many of these were saved via iPhone over the years so I'm not entirely sure of the sources, so if you know, please share!!! Some of them have poor picture quality, but they were images I Googled for "Candice Tells All" (I love Candice Olson!!) 

from Candice Tells All 

from Candice Tells All 

from Divine Design by Candice Olson

Source Unknown

from Candice Tells All

from Chris Loves Julia 

Source Unknown

Source Unknown


Source Unknown
There seem to be some common elements among the pictures:
1.)  The dark colors are balanced by white or by light (or both)
2.)  There are some reflective qualities to be found in each room (mirror, glass, etc.) 
3.)  Green (as in plants) makes the dark colors feel more alive 
4.)  With dark walls, the floors are kept lighter (contrast?)
5.)  Color is minimal and not the star of the show

Monday, March 11, 2013

A really good friend is all you need (and some paint)

I have an ah-mazing friend who supports my not-so-random bouts of insanity. Not long ago I mentioned that I was ga-ga over everything from Dana's Everything Room... one of my favorite parts of that room, though, was the paint color.
Image from Dana's blog, House*Tweaking
The color is Besalt from the Clark and Kensington line at Ace Hardware. While I have heard of Ace Hardware, I had no idea where one existed. So over a lunch break I Googled the closest address and then drove there... only to find that the store didn't exist in that location. If you ask me, if you go to the trouble to Google something and drive there, it ought to have the decency to be there!  In any case, I said something along these lines to a friend of mine (ok, maybe I said that exact thing...) and she quickly Googled Ace Hardware and saw a location that was five minutes from her house. She offered to stop by and pick me up a quart of the paint.  Isn't that Ahhh-mazing!?!

The next day I was the proud momma of this: 

Oh, yes. But now, I have a dilemma. I'm not sure where to put it. I would love to make my dining room mirror a little bit of Dana's room. I've always had the plan to do a wall of built-ins with two tall pantries and a storage console in the middle, on my dining room wall. With all the light upstairs, the room can handle the dark color.  And I also would love to, someday soon, do a small frame/wall partition between my living room and dining room (because while I am a fan of open concept, I am not a fan of open concept. I need some division here, people!!) But that is most likely not going to happen in 2013. So right now, with no separation between the dining room and living room, I do not have a good starting/stopping point for Besalt. 

I also recently stumbled across a kitchen that has me a little more intrigued than a simple white kitchen, and when I saw this kitchen, I immediately thought "wow, that would really look good with a dining room painted in Besalt." 


Images from the March 2013 issue of Canadian House & Home 

The kitchen has some of the basic concepts I have been wanting to do with my kitchen: white cabinets, black counters, stainless steel... (oh yes, and let's not ignore that uber-cute black and white striped rug....) But what I really like about it is they also added a warm element of wood. And that rustic pendant light had me at hello. But can you see it too--a kitchen with those elements right next to a dining room with the Besalt paint and white cabinetry?!?!

The problem is, as I mentioned, I don't have the separation between my dining room and my living room. So were I to Besalt my house, I would actually have to paint an accent wall along the long wall in my living room. Which... would be fine... BUT... it would mean re-painting the entire upstairs (including some very tall 13' entry walls...) since the current color on the walls (Benjamin Moore's Titanium) doesn't jibe very well with Besalt.  Welcome to split-level living, people. I'm not too thrilled to rush into doing that. 

I also love BM's Titanium... you  might remember from an earlier post that my bedroom started out with Titanium, then the color moved into the upper level living area (Kitchen, Dining Room, Living Room).. and now... the color may be moving downstairs. Is that insane? That might be insane. But it SOUNDS logical when you consider that my upstairs area has lots of windows and light and can support a dark color, and my lower level has only one window in the Media Room. So really, downstairs needs a light color. 

The only thing is... there is already a coat of paint downstairs that is very lovely--Behr's Southern Breeze. I'm surprisingly reluctant to paint over it. 

Here is the paint palette currently happening in my house: 


1.)  Benjamin Moore's Titanium #2141-60: upstairs living area (Dining Room, Living Room, Hallway)
2.) Benjamin Moore's River Blue #2057-10: Chevron Wall in Kitchen, accent furniture 
3.) Behr's Southern Breeze #450E-3: downstairs Media Room
4.) Martha Stewart Living Lamb #MSL225: Doors and Trim

So now I have a decision to make, obviously...on whether or not Titanium moves downstairs and Besalt moves in. And I have to make this decision fairly soon because we will be looking to start renovations of my Media Room fairly soon here. I did paint a quick one-coat sample of Besalt on my dining room wall: 
(sorry, once again poor lighting and an inept photographer can't capture the color very well... next time I crack the paint can open I'll make a paint chip and scan it in!) 


What do you think, should Besalt move in? 


Sunday, March 10, 2013

Sneak Peek

Here's a sneak peek of a project I started this weekend...


Stay tuned to see what color I paint it! 

Adding Texture


Lately I've been seeing grass cloth all over. It intrigues me. So the other day I was at Walmart, and I spied this:

It's contact paper, typically used for lining shelves, but it was the perfect color and texture of "grass cloth" (just super cushy and soft). So I grabbed a few rolls and also swung through the hardware isle and picked up a few packs of the small Command Strips. 
picture from www.comand.com 

Then I attacked my bookshelves. I removed all the books and knick-knacks from the shelves, dusted them  and then measured the size of the back of each shelf. Working one by one, I measured the contact paper and cut it out to size.  Then, once I had the sheet of contact paper cut to size, I slapped one little Command Strip on each of the corners. Then I tacked it up to the back of the shelf. 


What I really liked about the paper is that it actually helped hide the little lines that run down the middle of the shelf backs, since these were fairly cheap bookshelves from Target roughly ten years ago. They are starting to show their age, so I had thought a little paint might revive them, until I stumbled upon this idea. It's definitely not long-term, but for the short term, it's a nice little touch. 


I really need to get a better camera. And take some photography lessons.  I actually dropped my camera while taking snapshots of this project. I'm afraid my camera is not too happy with me anymore and it doesn't like to focus now... as you can see from the photo below.  Le sigh. Looks like I'll be taking pictures with my i-phone until I can replace the camera!


But I'm including this photo since it's the only one I took of the shelves showing one completed and one not completed.... it's important to note that at this point I got lazy. Once I loaded up the completed shelf with the books, I started doing one shelf at a time. Remove the books, paper the back, place the books back; do the same with the next shelf. It kept the mess a little more contained. Finally, I was done! 


As you can probably see in the first picture, the books cover up most of my hard work (boooo!) but when you see them in person it looks a little bit more classy than the cheap backs that were showing previously. All in all, not bad for $15 worth of supplies and an hour's worth of time.  


Wednesday, March 6, 2013

A New Kitchen Rug!

My new kitchen rug came in the mail the other day! I have been looking for a rug for my kitchen floor for a long time now.  Most "kitchen" rugs are very small little rectangles that only "fit" beneath a kitchen sink. But those little rectangles do not do such a super job of protecting my floors from water. See, I have a dishwasher that doesn't dry too well. Every time I unload the dishwasher, there is water still on some of the dishes. So when I take them out to dry and put away, water drips on the floor. So I knew I needed a rug that would fit beneath the dishwasher and sink area since that is where I do my unloading/drying.

So I brought up a rug I had purchased last year,  from Joss and Main.


I quickly realized with my bold chevron wall that the rug didn't work with the wall. So I removed the rug and kept looking for a viable option. I kept looking at many of the Indoor/Outdoor options on Ballard Designs, but they were sold out of the pattern in the sizes I liked. Enter the Braided Jute Rug.

Braided Jute Rug from Ballard Designs
I've never had a Sisal or Jute rug in my house because I am all about softness and from reviews, I assumed that Jute rugs felt like Sisal rugs. Translated: scratchy and itchy and definitely not comfy on bare feet. (Because I hate socks, slippers, shoes, etc.)  But I read the reviews and softness was mentioned, and the only thing that had me hesitating to purchase was the fact that a couple reviewers said the rug sheds often and you should expect to vacuum daily. (Boy, talk about a turn-off. I don't think I see my vacuum but twice a month...)  But then I saw the magic words-Sale! The size I wanted was available for only $60. Sold.

The rug came yesterday. I was a little worried about the rug because when I pulled it out of the bag, the rug backing was damp. I don't know if the delivery guy had it sitting in the snow or if it was sitting in the warehouse accumulating moisture, but the rug was damp and had a bit of a smell to it. So I turned it over so the bottom was face-up and hauled out my blow-dryer and gave it a good dry. (Insanity, you may say, but I was desperate to see the rug face-up and didn't want the wet pad to touch my floor!)  Once it was all dry, I flipped her over and there she lays.


The rug is soft. Bumpy, too, like getting a little foot massage every time you walk on it. And, though it's hard to tell with the lighting in the picture, the color plays very well with the floors. I got the Natural color and it has some darker browns woven into it when you look up close. In pictures, you can see a couple stripes in the weave (which one reviewer did mention), but it's really not noticeable when you are looking at it (well, if you specifically stare at the spot you may see the stripes..but I like stripes so really, I'm not offended.)  What I like about it is that it plays nice with the wall. There's no fighting going on between patterns or color. It also brings some rustic texture into my kitchen, and that, I like.

Also, I tested it out by unloading the dishwasher. There were NO water drips for me to clean up. I call that a successful purchase!