Friday, May 31, 2013

Going Gray

Gray is a hard paint color to get right. If you go too warm, you get into the green tones, but if you go too cold you'll be singing Elvis Prestley's Jailhouse Rock and wishing you could break free from cinder-brick walls. Or if you're me, you'll be singing Jailhouse rock (badly) while re-painting the cement-toned walls. I always gravitate towards pictures of rooms that have cool tones of grays on the walls-but in most of the rooms I like, the cool shade is balanced by warmer tones of wood.

Like always, I start with a little bit of inspiration. This is the shot I shared the other day that started this whole round of insanity:

Image from Room and Board found here
So here is where I did things backwards (naturally). I started looking for paint colors first. The first rule of decorating is to always (always) pick the paint color last.  But I am impatient and want to get on with it. Using the inspiration shot above I started looking for various paint samples in tones that worked in the light-filled living room. As I mentioned before,  I have a big window upstairs, so it can handle the darker color.  So I hauled out my paint swatch book and, like any smart painter, I went to Home Depot and purchased two test pots of color.  I painted two swatches on the wall and watched them throughout the day. Benjamin Moore's Gray Husky was the winner.  Interesting note-when searching on the Benjamin Moore site, Gray Husky is no longer listed/available as a color. 

Image found here

The next day, I went back to Home Depot and had them color-match the paint in a gallon of Behr paint. I lugged the gallon home. But then... something happened. 


The more I stared at the paint swatch on the wall, the more I saw green coming through. It could be the slightly green-tinted color that is currently on the wall, I rationalized.  But it niggled at me. So back to Home Depot I went and I grabbed three more sample pots of gray colors. This time, I made sure all of them were cool grays, instead of the warm gray that is Gray Husky. I brought them home and slapped them up on the wall. Sure enough, Gray Husky looked more green than the other grays. 

Colors are: Benjamin Moore Gray Husky, Benjamin Moore Silver Chain,
Behr Porpoise, Behr Gentle Rain and Behr Silver Screen. 
Once I had the other grays up on the wall, Gray Husky definitely looked more sage-green than gray. My favorite of the lot was Behr's Porpoise (third color down), but at certain times of the day, it seems more cement-y than I'd like. So I'm waffling. 

So during this entire paint-swatch indecisiveness, I was looking at my curtains. If my walls went gray, the curtains definitely needed switched up. Now, a little back story here--I purchased these curtains back in March, and wasn't 100% sure I liked them. They seemed... tropical. (Once again, apologizes for the poor picture... gotta get a new camera..but hey, it actually looks like I already have gray walls in this picture! which. I don't.) 


I knew if I kept these curtains I would have to purchase two extra panels to make them span the entire curtain rod when closed. But I wasn't overly in love with them, so I never made the additional purchase. But I also did not want to go back to the dark blue curtains, so I left them up. Now, alas, it is too late to return them. Fickleness is costly. 

So there I was, looking for new curtains. Cue inspiration shot. Gray walls and dark gray curtains. I liked.  So I browsed online, and this time, I was a little more picky. I knew I wanted: 
  1. Dark Gray
  2. Lined
  3. Width had to be at least 53" (which is oh-so-hard-to find in pre-made panels!)
Cue Ballard Designs. Their Essential Panel hit all three notes. In addition, I had a 15% off coupon to use. Oh lucky day! So I caved and purchased them in Trilby Basketweave Charcoal.

  
So then, I started thinking that I should not decide on the paint color until I get the curtains. For all I know, none of the gray paints will match the curtains and then I'll be back at square one. 

Speaking of square one--I'm oh-so-tempted to paint ONE wall in the Gray Husky. You know. Just to be sure. 


Tuesday, May 28, 2013

PTO--hhh

I am very excited. I have this week off from work (Personal Time Off) since Peyton's school ended (oh my gosh! How did my baby graduate from first grade already?!) and she has one week delay before her summer daycare starts.

She is talking about major swimming pool time and craft projects and I am thinking of the various projects I've been itching to get done. Here are some things I am considering.

1.)  I need to purge, clean and organize my linen closet and bedroom closet. (You know, so I can go shopping and make room for more clothes..I mean, so I can get organized, of course.)  I am thinking both would look lovely painted in this color. The color is Benjamin Moore's Caribbean Cool 661. 


(Because really, it'd be insane if I don't paint SOMETHING when I'm not at work...) 

2.)  One of the projects that I picked up some supplies for was to create a wooden starburst mirror as initially seen on the Home Depot blog for the Style Challenge. Cassie from Hi, Sugarplum had crated a sunburst mirror and it looked fabulous. Fabulous as in-I-need-to-have-this-right-now-fabulous. Check it out here.

Image from Hi, Sugarplum 
Then, I was reading another blog, 7th House on the Left, and Ashley created a differently styled starburst mirror (read: more labor-intensive and a little more expensive). I liked Ashley's take as it was more star-like, and more similar to the starburst mirror I have at home (slowly but surely trying to amass a collection).  Check it out here
Image from 7thHouseontheLeft
Both gals used theirs for outdoor art, but I don't really have a good location for outdoor art (the only patch of open wall that might work on the deck has cable wires running smack down the middle). So instead, I am thinking of spray painting it gold or doing some gold-leafing and use it indoors. 

3.) Painting the upstairs Living room Gray. I think I'm taking the plunge to the gray side.  I mentioned before upstairs gets a ton of light, so I think it can handle a deeper color. Plus, gray will contrast nicely with the white trim and doors. And of course, it will bring me one step closer to "modern." I'm inspired by this image from Room and Board
Image from Room & Board here
Speaking of... Room and Board-ohmigosh! Where have they been all my life?! This styling is RIGHT up my alley..some retro-y vintage pieces offset with lots of leather, modern furniture and walnut woods... be still my heart. This is the image I am most drawn to and I am thinking it will do quite nicely in my lower media room:
Image from Room & Board here
The gray, the walnut, the pop of yellow.... But I digress.

4.) Last, but not least, the deck. If the weather plays nice (it hasn't been-in fact the weather man is calling for rain and storms all week... how like a man..) I would like to power wash and stain/weatherproof my deck. John and Sherry from Young House Love had a great post sharing how they did this with their deck and it couldn't have come at a better time. Check the post out here!

So those are my top contenders for projects to do between playing with my girl while I am on PTO. 

Anyone else out there enjoying extra time off with the Memorial day weekend?  

Sunday, May 26, 2013

Headed to the Lake!

We are headed to the lake today for Memorial Day. Fingers crossed that the weather (which is predicting 30-50% chance of storms all day) plays nice. 

Peyton's prayer last night included a plea for"nice boating weather so we are not in the cabin playing boring games all day." Is it bad to laugh when your child sends up a serious request to God? 


Thursday, May 23, 2013

My baby shoots-she scores!!

Anyone who knows me, knows I have a black thumb when it comes to plants. Overwater, underwater, forget the plant exists for months at a time and then act surprised when it's a skinny bedraggled stalk... 

Yeah. I have a love affair with plants. I am not so sure that my love is reciprocated.  But lately, fiddle leaf fig trees have been all over the design world and I had to have one. (No, Alma, there's no figs on these trees...) 

I emailed my garden center a few months ago and they had one in stock.  It was badly sun-damaged, and I honestly wasn't sure the tree wouldn't take one look at me and just rattle it's last breath right there on the spot...but I gave it a shot. 

So this baby came home with momma. 


Amid dire predictions from friends and family and doubtful looks at the sun-damaged leaves, I persisted. And just yesterday I noticed my baby is growing. There are 3 new fig leaves sprouting up!!! 


I'm like a proud momma-- I didn't kill this one!!! 


Here she is in all her glory... You can see she's lost a lot of leaves and there are still a couple damaged leaves bravely hanging in there... But this one, she's a fighter. And she's already won my heart. 

And wow, these are like the worst iPhone pictures ever. I have got to get me a new camera. Any recommendations? 

One piece at a time..

It's the small steps that make it seem like something is actually happening and there IS progress in this small slice of my world... 

My deck now has a table. 


Progress. I knew going into this relationship that it would require some effort to look pretty and inviting. Kind of like putting in mascara in the morning- it's the finishing touches that glam it up. Like the mascara I forget to put on 98% of the time, this table without cushions is not so inviting. 

It has them...all eight of them.  I just have to haul them in and out from the garage and It's. So. Far. 


It's hard to see, but the door with the wonky blinds leads to the garage. And there's a flight of steps to the garage. 
Yeah, call me lazy. 

So I knew I needed a deck box. So I looked everywhere (and by everywhere,I mean Target) and I didn't  see any that I really liked. They are plastic. And brown. And brown plastic offends me. 

Parents to the rescue! So my folks were shopping the other night and they saw a deck box, 120 gallons worth of storage, doubles as a bench and only $90. They sent me a picture:


Costco. Go figure. Yes, it's brown. And plastic. But it's a really dark "wood look" brown. So I will try not to be offended. (And I will try to stay 5 feet away from this can of black emergency spray paint that just happens to be within the vicinity.) 

So my Papi set it up for me tonight. Here she lies. 


I immediately started nesting. 

Sadly enough, not all of the cushions fit. I was able to squish in all but ONE. 

I may need to visit Costco for a mini version... But huge sigh of bliss... Now I don't have to walk those 10 steps further to the garage...

Sunday, May 19, 2013

Splash of Color

Today I am making brownies and painting my back door. With the weather being a little persnickety today, I couldn't get working on cleaning and staining the deck like I'd hoped. So I am mostly indoors today. 

But first- inspiration: 


At this point I am thinking my deck color scheme is still teal and green. (Though I did get intrigued with some dark purple pots I saw the other day... I could do teal and purple...) In any case, I know teal is the main accent color! Pretty sure, anyway. 

Enter the new planter I picked up yesterday. The teal adds a nice bright pop of color to my deck and has me thinking there really needs to be more color out there. But alas, with 60% chance of storms this afternoon my eye wandered to my back door. 

This is the view I started with: 


The interior door has never been painted. It is an ugly faded off white door with a strong yellow tint to it. It is not rocking my boat. 


And this is a progress shot. Best of all- it's free! I am using the leftover paint from my front door-so it makes for a quick and easy splash of color. 

At some point I would like to replace the outside storm door with a full glass pane French door so I can see more of the color. But that comes later. Deck first, people!

Anyone else painting doors while waiting to gouge themselves on decadent tasting brownies?

Saturday, May 18, 2013

Suitcases for Peyton

Went shopping today- on the agenda was looking for some teal planters and flowers for my deck. While driving, my mom and I spied a secondhand antique/consignment type store, and we immediately detoured.

These came home with me. 

Talk about adding character to a home. I fell in love with the camel leather and old style suitcases and immediately had visions of Peyton tidily cleaning up her toys every evening into these handsomely, über-cool storage bins. (How's that for justifying a self-centered purpose?! I want them so I say they are for Peyton... Yes, that is how I roll.) 

When I brought them in and told Peyton they were for her toys, the girl immediately grabbed some toys from her room and started loading them up. 


She laid claim to them in 5 seconds flat. "Mom, I need to put my computer in MY laptop carrier." (Apparently the girl thinks the small suitcase resembles my laptop bag.) 

I'm calling this a win-win. I get to gaze lovingly at somebody's old luggage set and bask in my intelligence of hiding Peyton's mess of toys while she thinks its a super cool laptop case and gets a kick out of picking up toys. Ah, bliss. 

Anyone else finding old suitcases and hauling them home and using their kids as an excuse to do so? 

Friday, May 10, 2013

West Elm has got it Going On


Lately, West Elm has been revving my engine.   And don't even get me started on their rustic and mid-century styled furniture lines... I'm really sad we don't have one in Iowa. But maybe that is for the best--they might object to me moving in lock, stock and barrel. Here is a roundup of things from West Elm I am crushing on-- fabulous little pieces of yumminess.

Accessorizing with West Elm


Zigzag Floor Pouf / Martini Side Table Antique Brass / Large Rectangle Lacquer Trays / Curved Storage Basket / Slim Lacquer Jewelry Boxes / Industrial Task Table Lamps / Reclaimed Wood Shelf Silver Branch Brackets / Playa Throw | west elm


  1. You can never have too many lacquer trays. I have one of these in white and it has saved my sanity (and my coffee table). 
  2. Rustic wood. Silver branches. It just doesn't get any better than this. 
  3. Like lacquer trays and pillows, you can never have too many baskets. This one has a nice curved shape--it would be great for storing all those pillows and blankets I collect. 
  4. Yellow. Lacquer. Storage. Nuff said.
  5. These stools come in many colors, but the gold sparks my interest the most. You can use them as a side table, as a seat, indoors, outdoors. This one does it all. 
  6. This would be a good blanket for hauling outdoors on windy days--not too precious for outdoors use. 
  7. This yellow light makes me happy, though heavens knows where I'd put it. 
  8. I'm in love with these poufs. My tushy thinks they would be super-nice for game nights. 
What stores are you crushing on? 

Thursday, May 9, 2013

Table Knockoff


Have you ever had a moment of pure brilliance only to have it smashed into a million little pieces that resemble your sanity on the best of days? Earlier today I had an AHMAZING notion that the table set I really lusted after from Grandin Road was a simple design and it could be easily customized from a cheaper set of tables. I am, afterall, no stranger to spray paint. If only I could find the right set.

So I Googled for "metal nesting tables" and a celestial chorus started singing in my head. I saw the perfect trio of metal tables at World Market--the Ashton Nesting Tables.. $150 for the trio.

Ashton Nesting Tables, World Market

Really, is that not perfect or what?! Grandin Road's trio is $229. Then my record scratched. Online stated it was on back-order. I have no patience for back-order. I am all about immediate gratification.  So over lunch, I dashed into World Market. I searched high and low and I even went so far as to harass a rushed clerk into looking for me. Zip. Zilch. Nada. Bubble of excitement = popped.  

I may find myself haunting World Market until this trio comes in. I mean, honestly--can't you see it?! 

Table Knockoff


Set of Three Hailey Metal Nesting Tables - Grandin Road / Ashton Nesting Tables, Set of 3

If someone out there sees these in their World Market, they need to purchase a set ASAP because this would be an amazing deal and a super-easy project to spiff up your deck and customize it to your color scheme!!! 

Take it Outside: Accessorizing the Deck

Now that I have the main furniture pieces selected, I am already thinking of decorating the deck to make it an inviting summer room. Because that's what I do.


Take it Outside


Pottery Barn Malena Outdoor Pillows - Cool / 9 Foot Auto Tilt Umbrella / Set of Three Hailey Metal Nesting Tables - Grandin Road / Square Devon Self-watering Planter - Grandin Road / Classic Pedestal Table - Grandin Road / Rubbermaid Basket Weave Deck Box/Trunk - Dark Brown : Target / Garden Seat with Rings | Ballard Designs / Globe Outdoor Sconce | west elm / Zig Zag Outdoor Pillow - Grandin Road


  1. I need to replace the cheap lights by the back door and garage door-and as soon as I saw these lights at West Elm, I knew I had to have them. 
  2. Every deck needs pillows. and this pillow from Pottery Barn fits my color scheme quite well. 
  3. Some day, I would like a pergola on my deck. Until then, an umbrella is needed for shade. This one from Ballard Designs is quite pricey, but since it has an auto tilt function, it might be worth it to block the shade at any angle. 
  4. Every deck needs plants. This one from Grandin Road is self-watering. The plants will thank my black thumb to stay away from them. 
  5. I am absolutely gaga over this nesting table set from Grandin Road. They are the perfect color. 
  6. Again, perfectly colored, these two garden seats from Ballard Designs are nicely priced and will be good for additional seating, drink and plant placement.  
  7. I have a thing for pillows. Obviously. This pillow from Grandin Road also ties in with the color scheme and lets my love of stripes come out to play. Chevrons no less. 
  8. Another favorite from Grandin Road-this table is easily portable and comes in a rainbow of colors. I could even see it moving indoors! 
  9. Not pretty. But practical. With my selection of uber cushions on the new dining seats I am thinking cushion storage is a must. This is brown, though, and needs to be black. A little Rust-Oleum spray paint may fix that though. 

Wednesday, May 8, 2013

Meet Little Loo

Meet Little Loo. This is the "powder room" in my lower level. She recently got demo'ed a few weekends ago, so that I could test out the new flooring in the bathroom before committing to doing the entire Media Room with the floor. So Little Loo got nekkid.


Since Little Loo was not originally in the initial plans for the Media Room renovations, I am looking to do Little Loo on a budget. So I have done a lot of shopping around at the big box stores (Home Depot, Menards, Lowe's, etc.) and online, and I have selected what I think will be the final pieces in Little Loo.

Little Loo


Threshold Wastebasket Home Light Happao Rattan Weave / 3-Light Brushed Nickel Bath Light-25090 at The Home Depot / Wilton Etagere | Ballard Designs / American Classics Artisan 24 in. Vanity with Marble Vanity Top in... / Reclaimed Wood Shelf + Silver Branch Brackets | west elm / Pfister Jadia Single Control 4" Centerset Bathroom Faucet at Menards / American Classics Artisan 31 in. x 24 in. Wall Mirror in...


  1. This bamboo-like etagere from Ballard Designs had me at "hello."  Ok, so realistically, this item blows the whole budget out of the water, but it is nice to dream.
  2. I finally selected this Hampton Bay vanity fixture from Home Depot when I couldn't find another light I liked. 
  3. I would love to have a round wood mirror, but until I find one I like that fits the space, this mirror from Home Depot is a nice companion to the bath vanity I selected.
  4. I love these rustic shelves with silver branches from West Elm. West Elm can do no wrong.  A trio of these shelves will be nice until I can afford the etagere from Ballard Designs (item #1).
  5. This vanity from Home Depot is contemporary and will work well with the floor I selected. 
  6. One of my pet peeves is a faucet that is too close to the back of the tank. With long fingers, my hands are always hitting the back of the sink when I wash. This faucet from Menards has a waterfall flow so hopefully my knuckles will no longer touch the back of the sink. 
  7. A little texture is a good thing. I have this Target wastebasket upstairs too and it adds a nice little touch of texture.
It will be nice when Little Loo is all dressed up. Honestly, she just might put the rest of my house to shame. 

Tuesday, May 7, 2013

Little Loo gets Nekkid.

I mentioned the other day that we are working on my basement and we demo'ed the bathroom. Here is the bathroom in all its horrific glory, pre-demo:

Exhibit A

Exhibit B

Exhibit C

Yikes! I am not sure where to start. This is a good example of weird choices that were made in "finishing" this basement. Check out 3 walls paneled in faux beadboard (exhibit A and exhibit B), and then check out the fourth wall paneled in ... I'm not actually sure that that is. Ugly blue faux marble?! (Exhibit C). I'm telling you, this bathroom was a crime scene. 

So I happily participated in demolitions! All the paneling was knocked down, that bathroom cabinet and mirror were trashed, and I personally attacked that ugly blue tile with a vengeance. 


You can see we had to bring in a lamp for lighting once we removed that hideous mirror. This bathroom has no window, and the hall light doesn't reach it. We also decided to remove the panel that was installed around the doors in the little passage-way because I wanted the light switch to be removed from the outside of the door (seriously?! Who does that?!) and moved to the inside of the bathroom. That left a hole. So, since that paneling had to go at some point, it seemed like a good time to take it down. 


 Then we ran into a problem. Somehow, when the doors were installed, the paneling was used as actual support for the door-frames  So it appears that for the bedroom and laundry room doors, we are going to have to take the doors down and re-hang, in order to remove the paneling. I heard my dad muttering about getting a contractor in and heard $$ signs on an old-school cash register chiming in my head.

But the demolition is done. The awfulness is out (well, with the exception of the vanity). The bathroom will need to be finished so I can test out the new floor before I can finish the media room. So little Loo has been upgraded to Defcon 1.   Here is the list of what needs to go down:

  1. Hang drywall
  2. Mud drywall (to occur at the same time we hire a pro to mud the Media room)
  3. Install new light
  4. Paint
  5. Install flooring
  6. Install Vanity
  7. Install Mirror

As with the Media room, there is much to do. But she's a smaller package, so I am hoping we can crank her out a little more quickly!

Monday, May 6, 2013

The Patio Table Challenge

With my basement in total disarray and warm weather outside, I have turned my fickle eye towards my deck. When I first bought this house, what truly sold me on the house was the deck and yard. I remember standing at the kitchen window and thinking of summers outside on the deck while Peyton ran amok in the yard. I haven't really done anything with the deck since moving in.  My dad built a swing-set for Peyton a couple years ago, and she (and other neighborhood kids) loves playing on it.

But spending time outside hasn't been quite as lovely for myself. I am not a huge fan of the sun. And my deck doesn't get a lot of shade (ok, hardly any). To add insult to injury, the only deck furniture I've had were a couple of plastic chairs and a wooden rocker. I love the rocker, but as my tush has no padding it is not the most comfortable seat for me. So, for the last few years, I have not had any fun on my deck.  Last year, right before winter set in, I did purchase a love seat at a steal, but I have not been able to use it until recently. It has not-overly-attractive-but-plush cushions.So sitting on my deck is now comfortable for my bony little tush.

Some of my favorite bloggers have been participating in the Home Depot Patio Style Challenge, and I have been inspired by the updates theses bloggers have made to their outdoor spaces. It makes me want to pimp my deck.  So, last week, after Peyton and I had a very sad little attempt to eat our dinner on my table-less deck (picture the two chairs pulled up to her kid-size picnic table...) I decided a table for our deck was a necessity in order to enjoy this summer outdoors.

I did not want to spend a lot on my table set since I still have my basement renovations to finish. So I shopped around-Home Depot. Menards, Lowe's, Target, World Market... and finally narrowed my choice down to two options at Home Depot:
Option A

Option B

There were pros and cons to both options.

Option A:

  1. The chairs were comfortable for reclining in--they rocked and swiveled and all that jazz. 
  2. No cushions meant no maintenance. I could leave this set out even in rainy weather and not have to haul cushions back and forth. 
  3. The set is brown. While not my favorite color (at all), it would match the love seat on my deck.  

Option B: 
  1. The cushions made for uber soft seating--my tush was happy with layers of padding between it and the chair. 
  2. The seats rocked forward a bit to allow for easier dining. (Which, after all  I am looking for a table to eat at, not relax at.)
  3. The table was more aesthetically pleasing- the shape was perfectly square and black, with a clear glass top. Much more modern and more suited to my tastes.

I was really conflicted between the two. What finally made the decision for me was seeing Peyton sitting at both tables. Option A was a much higher table, and it was more difficult for Peyton to eat at easily. Yes, she'll grow, but when I pretended to be typing on an invisible laptop at Option A, my arms got tired with the height. So that cinched it. I went with Option B. Because fake laptop typing makes all the difference. 

Option B came home with me. And the very next day we were hit with a freak snowstorm. So the patio table is still in its box, taunting me. 

Sunday, May 5, 2013

Besalted.

My upstairs bathroom is in desperate need of a renovation. But alas, until I finish my basement, it is not in the budget.  But I had this quart of Ace Besalt paint, and it really needed to go somewhere. So one day, as I was in my upstairs bath, observing the tan and white stripes that bled through the blue painter tape (blue = bad for stripes, green = good for stripes)--it hit me.  I could Besalt my bathroom and finally put up the gray and white stripe West Elm shower curtain I'd gotten for Christmas.

Get rid of the bleeding stripes? *ding*
Finally use my  new shower curtain? *ding*
Keep stripes in the bathroom with the new shower curtain? *ding*
Use the quart of Besalt paint I paid for and have a dark room somewhere in my house? *ding ding*

Really, it was a win-win-win... win.

I am a bad blogger and didn't capture a "before" shot of the stripes before I painted, but here is a picture of the bath wall and tile on the day I moved into the house:

Exhibit A
Observe the cheap tile, faux brown marble vanity sink and builder vanity mirror (with its one light-bulb falling out). There is honestly not one thing that works for me in this bathroom. The tile is cheap and old (and falling off in certain places), the floor is yellow, the vanity sink is flowery and faux brown marble, and my hands are forever hitting the back of the sink because the faucet is so close-set. And don't even get me started on the non-matching wood finishes.  But this is all a story for another day, when I can actually do something about the dated, defective finishes.

Today it's all about creating a distraction that is loud enough that you do not notice the ugly finishes Solution: Ace's Besalt paint. See Exhibit B. 

Exhibit B
Much. Much. Better.


The charcoal paint definitely  modernizes the bathroom, and makes the focus less on the dated finishes and makes it work. For now. There is still lots to do in this bathroom, but until the basement is done, it's tolerable. 

One note about the brand of paint--Ace Clark + Kensington Paint. It was the first time I painted with this brand and honestly, I have to say, I am not a fan. The color is gorgeous, but it does not go on as well as other brands I have tried. Part of it could be due to the fact that the quart I used is a flat enamel. I really debated using it in the bathroom because typically you want s a semi-gloss or eggshell in the bathroom--something with durability to it in case it gets wet and needs to have some wash-ability to it. What finally prompted me to use it is the can boasted to have a "non-reflective finish with excellent washability". What I discovered is-if any water gets on it, it leaves reflective streaks or spots on the wall. In addition, when I put up the curtain rod, the paint scratched very easily-there was no durability observed in the paint itself.  Maybe had I used a eggshell or semi-gloss it may have had better results, but I will most likely not being buying this paint again! Leaving you with one last picture. 


On My Radar: May

On My Radar: May


Body moisturizer / Pottery Barn Douglas Spotlight Table Lamp / Slim Lacquer Jewelry Boxes / 14.5 oz. 3-Wick Candle / Hampton Bay Fenton 3-Piece Patio Chat Set with Peacock and Java... / Grey


  1. I love Lacquer Boxes. I've been craving some happy yellow lately, so when I saw this lacquer jewelry box at West Elm, I was sold. 
  2. With warmer weather outside, I have been looking at new patio furniture. I already have a love seat, so I think this set of chairs from Home Depot will be a nice addition to my deck. 
  3. I love this gold tripod lamp from Pottery Barn. Rustic, Shiny, Gold-this is a trifecta of yumminess. 
  4. Peyton dragged me into Bath and Bodyworks last week for some hand sanitizer and I fell in love with their Fresh Picked Pear scent.  I am tempted to buy out their whole stock. Every time I find a scent I like there, they seem to discontinue it. 
  5. This plush rug from Rugs USA looks super plush. Makes feet happy. 

What's on your radar this month?

Rustic Modern Media Room

I have been playing around with a color scheme and decoration for the Media Room. I definitely know I want to bring in more of the rustic modern style. Since it's a basement room, with only one window, I hesitate to bring in dark colors. So even though I am not a huge fan of one accent wall in rooms, I am toying around with  the idea of having one wall be dark gray while the other walls remain light. The trick will be bringing in enough shiny and reflective surfaces that it bounces what little light is down here around the room.

Masculine Modern

Saturday, May 4, 2013

The Media Room Reno Begins....

I've been sick recently, and busy with work,  and when I'm not busy being sick, I've been been trying to get things done around the house. And sadly, not very committed to this blog with all that is going on. We'll just chalk it up to commitment issues, annnd, moving on.

Renovations on my basement have started! When I first moved into this house, the lower level was only partially finished--in the main room, the walls and ceilings were finished, but in the laundry room, back bedroom and half bathroom, the walls and ceilings were not finished. I should probably clarify that... they were "finished". There were just some really weird (*ahem* cheaaaapp!) design choices going on with the finishes. The back bedroom for example--an unfinished ceiling,  and there is one wall that is all pegboard and the rest of the walls are cheap shiny beadboard. Yech. There is beadboard done right and then there is my lower level bedroom. Neither belongs in my house.  I shudder.

In any case, since moving into this house, with my Dad's help, we have made a few updates to the lower level family room. We have:
  • Installed new carpet in the family room 
  • Installed a Gas Fireplace
  • Installed a French Drain around the perimeter of the basement floors
  • Put window trim around one of the unfinished windows in the family room
  • Replaced two horrific boob lights with nice track lighting
  • Knocked down a wall between one bedroom and the family room to make one large room
When I knocked down the wall, I had every intention of patching the holes and closing up the poles and generally, oh you know, finishing the room. Fast forward two years. I can't seem to find the "before" picture of the room, but in the two (very poorly taken Iphone pictures) I captured some of the "holes" that needed closed up. 


 (And, yes, in the second picture, you can see the dresser I started to paint. There was one drawer that was cracked so I handed it off to my dad to see if he could work his magic and fix it.It's just yet another 1,001 unfinished projects floating around the house.)

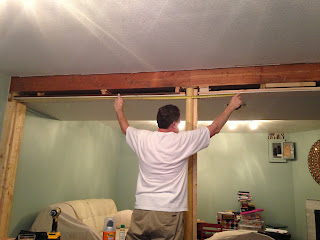
In any case, there is a laundry list of things to do in the basement. My dad has been busy with moving some light boxes and closing those holes off with drywall. I helped where I could, of course (mostly by sitting on the sofa, drinking coffee and making comments about how it was just like watching HGTV); but it was mostly mister handy man doing all the work. Gotta love that man.


I had also decided that I really wanted to test the new floor "tiles" I selected before purchasing enough to complete the basement, so I decided to test it out in the lower level bathroom first.  So.... we started demo in the bathroom, too.  But that's for another post.

Here are the holes dry-walled up and pre-mud:


Sorry for the poor pictures. I still need to buy a new camera. Oh, yeah, and take five years of photography lessons. My laughable photography skills aside, back to the room. This room will be my Media room. I am thinking movie nights, game nights, my library and a craft area. Yes, this room is going to do it all. But there is a lot to do before I get there. Here is my list:

  1. Mud the newly installed drywall (we will have to hire a pro for this because I am all about perfection.)
  2. Build columns around the poles
  3. Paint. (The color is lovely, I will admit that, but I'm not feeling "modern" with it.)
  4. Install new flooring
  5. Install new Trim (baseboards, moulding)
  6. Replace fireplace tile (currently it is two different shades of marble tile--very distracting!)
  7. Enclose the electrical box in a cabinet.
There is a lot to do. And that's just the boring skeletal stuff-- I'm already anticipating the fun stuff--decorating! Stay tuned for inspirational mood-boards I've been playing with for the new Media room!